suecrook513802eyv

Level 1 course for BA Photography Degree
express your vision
open college of the arts
Exercise 1.1
Take 3 or 4 images of the same scene or item.
Are there any changes between the images? Check in your cameras histogram and settings and make notes of these in your learning log, with copies of the images.
I chose a simple subject, a latch on a neighbours back gate. It was a dull cloudy day with the sun occasionally peeping out from behind the clouds.
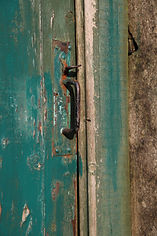
The 1st image I took had no sun, so hardly any shade or highlights to it. Tonally it looks quite monotone in appearence because of the lighting. The cameras readings were:
ISO – 100, Speed – 1/200, F – f/5

The 2nd image had the sun just coming out so was brighter and some tonal highlights and shade, which gave the image more depth. The cameras readings were:
ISO = 100, Speed – 1/200, F – f/5

The 3rd image was brighter again and had less wall with it. It had extra tone in the overall photo in my opinion making this one the best image of the three. The cameras readings were:
ISO = 100, Speed – 1/200, F – f/5
Result – What did I learn from this exercise? I learnt that no image is ever the same even if its taken straight after one another and there are always slight diferences in a image. I could see these differences in the histograms on the camera information, even though the settings didn’t change. It would be interesting to set this type of project up, but have an hour between each picture, to see what the difference would be after that.
Exercise 1.2
1 – Take 2/3 photos in which a single point is placed in different parts of the frame.
Not sure what is meant by a ‘point’? I took some images of a disgarded bottle but wasn’t sure if its classed as a shape? so I am going back to reshoot these as I’m not happy with the outcome.
I have decided ‘point’ is in reference to a small area where the camera focuses on in a frame. Having looked at several other students logs this seems to be what other students are doing as this exercise.
Exercise 1.2 – Point – Part 1

is in the middle and has equal spaces around it, out of the three photos shown its in the most pleasing spot.

this doesn’t really work in this photo/subject, but for a landscape it
could well work using the ‘rule of thirds’ as a guide. The top 2/3rds could be sky the bottom 1/3 landscape or vice-versa.

again this doesn’t really work as its in the top right hand corner and there isn’t really anything to lead you into the subject (even though the lines of the tiles do this slightly – it isn’t enough…).
Exercise 1.2 – Point – Part 2
2 – take a number of images in which a point is placed in relationship to the frame?
Can you find any place where the point in not in relationship to the frame? If its in relationship to the frame you can place a point in any part of the picture and the picture is balanced.
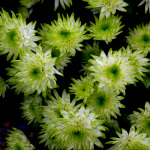
The first photo is an excellent example of how a photo works composition wise. The main part of the group of flowers has a triangular shape which is always pleasing to the eye, the black back ground takes nothing away from the main subject.

There are lots of small triangles in here. The colour is pleasing to the eye.
Exercise 1.3 1 Line
Take a number of shots using lines to create a sense of depth. Shooting with a wide-angle lens (zooming out) strengthens a diagonal line by giving it more length within the frame. The effect is dramatically accentuated if you choose a viewpoint close to the line.

This image has its vanishing point in the center where the arrows converge and its leading lines follow the vanishing points. The road is a natural diagonal line to follow giving the image depth.

This images vanishing point stops in the middle of the picture, but the sky then shows interest and makes your eye automatically go upwards.
Exercise 1.3 2 Line
Take a number of shots using lines to flatten the pictorial space. To avoid the effects of perspective, the sensor/film plane should be parallel to the subject and you may like to try a high viewpoint (i.e. looking down). Modern architecture offers strong lines and dynamic diagonals and zooming in can help to create simpler, more abstract compositions.
Review your shots from both parts of Exercise 1.3 How do the different lines relate to the frame? There’s an important difference from the point exercises: a line can leave the frame. For perpendicular lines this doesn’t seem to disrupt the composition too much, but for perspective lines the eye travels quickly along the diagonal and straight out of the picture. It feels uncomfortable because the eye seems to have no way back into the picture except the point that it started from. So for photographs containing strong perspective lines or ‘leading lines’, it’s important that they lead somewhere within the frame.

This image is confusing and your eye doesnt know where to look or where to go in the image. The house is a big part of the image and is just there forcing your eye to look at it, but not doing anything for the image. The fire leads your eye up and out of the image as its such a dramatic part of the shot. The lines lead you up and out of the image.
Exercise 1.4
The final exercise of this project makes use of the viewfinder grid display of a digital camera. This function projects a grid onto the viewfinder screen to help align vertical and horizontal lines, such as the horizon or the edge of a building, with the edge of the frame. if your camera doesn’t have a grid display, imagine a simple division of the viewfinder into four sections.
Take a good number of shots, composing each shot within a single section of the viewfinder grid. Don’t bother about the rest of the frame! Use any combination of grid section, subject and viewpoint you choose.
When you review the shots, evaluate the whole frame, not just the part you’ve composed. Take the same approach you used to evaluate the point and line exercises: examine the relationship of elements to the frame. Composition is part of form and formal analysis will be a useful skill for your exercises and assignments as you progress through the course.
Select six or eight images that you feel work individually as compositions and also together as a set. If you have software for making contact sheets you might like to present them as a single composite image. Add the images to your learning log together with technical information such as camera settings, and one or two lines containing your thoughts and observations.
How do you frame an object?

A group of waterfall images. As you automatically think the water is dropping down, this collage works as the eye is fooled into following the water down the page.

Waterfall grid 1 – the water meets at the center of the grid.
Waterfall grid 2 – this grid uses the rule of thirds rule of photography, where all the image line converge on the lines of the grid.
